Roll 2: Development Mistakes
Making mistakes in Photography is something that no photography can ever totally avoid but not all photographers can make there mistakes look like they were done on purpose. The most famous example of this that comes to mind is what happened when Man Ray's assistant Lee Miller accidentally opened the dark room door while Man Ray was printing leading to an interesting effect called Solarisation.
I am still waiting for that inspiration mistake to happen to my photography. My mistake while developing my second roll of film in comparison lead ruining most of the roll.
I had arrived early for the next class for some extra dark room time so I picked up a tank and some spools, it was only after three failed attempts to get the film on the spool did I decided to put the film into the tank and take a breather and figure out where I was going wrong. Here was the mistake was made. I had only placed on the top lid and forgot add the stem in first, so the artificial light was just pouring all over the film.
It turns out that the first spool I was using was defective. The spools have two ball bearings to help feed the film through the only I lost all confidence on only had one so the film could not be fead on correctly. After getting a new spool I was eventually able to get the film on the spool and ready to be developed. Lucky I had turned up early as I was able to finish up just in time for class. Some what disappointed that the film just have black rectangles where the images should have been.
This time I shall forgo the proof sheet as I only got a few usable frames. But for the technically minded it I was developing Kodak Tri-X EI400 in XTOL1:1 for 8.5min at 20C. As there were so few useable images I have not bothered to make a proof sheet.

Water Lilly, Royal Botanical Gardens Sydney.
This shot was taken down by the main pond at the Royal Botanical Gardens with a Vivitar 85-205mm f3.8 zoom lens that also has a close focussing feature. What drew me to this image was the soft tones of the lilly petals compared to the slightly spiky stem. The shot was taken at 1/60 f8, which I felt comfortable hand holding at the time.
Also notice that the bottom of frame has been fogged out from the light leak.

Gerbera Petals
When I was at the florist trying to find some flower to make a photograph of I, then one thing that I kept in mine was that I wanted something that had tonal variation on the petals. Shooting black and white one must always keep in mind how the light, tones and, textures will render as tones of grey.
These Gerberas had some lovely pink tips that I expect would look great in black and white in soft light. In the end what makes this shot for me is the fogging that happened on the bottom half of the frame, which opened up this square crop.
I quite like this shot, sure it is not perfect. But just maybe the mistake came up with something interesting.
 Print Article
My First Developed Roll
When I first came up with the idea to make a photography blog I was trying to come up with ideas to make the content of this blog different from my Flickr Stream. So one of the things I am going to do is to post my contact sheets and look at 5 images off the roll to discuss why I took the shot, what I like about it or what I should have done in hindsight.
This is the first roll of Black and White film I ever developed back in February this year (2011). This year I have made a promise to myself to try and take my photography to the next level. So one of the things I had decided to do was to take a class and learn something new. The Australian Centre of Photography had an open day where you could go in and discuss what courses they were offering. What they forgot to mention was that there was a test to determine how much technical knowledge you had about photography before discussing what classes were options for you. So after passing the test I enrolled in Process, Proof & Scan, I had already been shooting some colour film so Black and White was the obvious next step.
The course was run by Michael Waite ( Flickr, Blog) who happens to be a great guy and very knowledgeable about all things film. I really enjoyed the course and hope to go back soon to do the follow up course Black & White: Print later this year.
For the first class we were asked to shoot a roll of film to process in the first class, they suggested Kodak Tri-X so to keep things simple that is what I chose and have since fallen in love with. It was also suggested to try to shoot in different types of light, and try bracketing some shots so you can see what it looks like on film as working with film is really a 2 step process, capture and development.

Proof Sheet 001
The film used was Kodak Tri-X with EI400 (exposure index) and was developed in XTOL 1:1 for 9 minutes at 20.5 C with agitation for the first minute and then for 10 seconds every minute afterwards. I used water as a stop bath, Kodak Rapid fixer for 5 minutes and finally Hypo Clear for 2 minutes before the final water wash.
At a later stage I will go into more detail about the development of film. When you develop film there are a couple important variables, film speed (ISO), exposure index (EI), developer used, time, temperature, and agitation. Different combinations will give you different aesthetic looks.
The white marks that you see on the contact sheet are from when the film was in contact with it self so the developer got stuck on that part of the film. The cause of this was me being in a rush to load the film and forcing it on to the real. This caused some of the film to buckle and jump out of the grove.
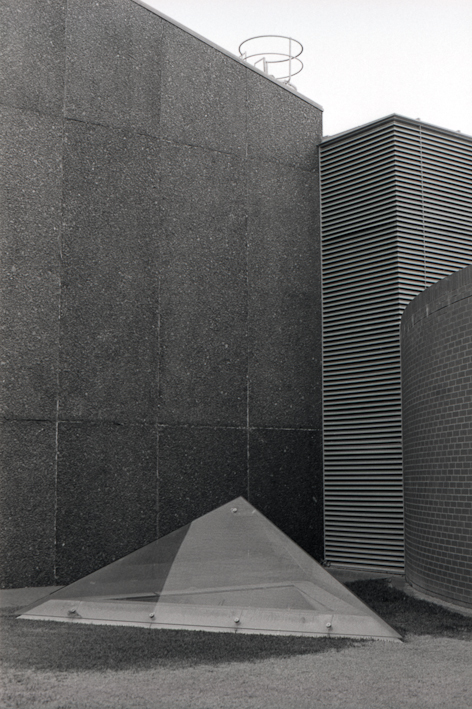
Geometric Shapes at Sydney Uni
This was taken is just off the main walkway at Sydney Uni. I originally found this as I was wondering around looking for an interesting pice of architecture for an online competition last year. What attracts me to this location is the strong geometrical shapes of the triangles and circles, with the strong bold lines and smooth curves of the circles. The other thing I like about the location are the different textures of each surface.
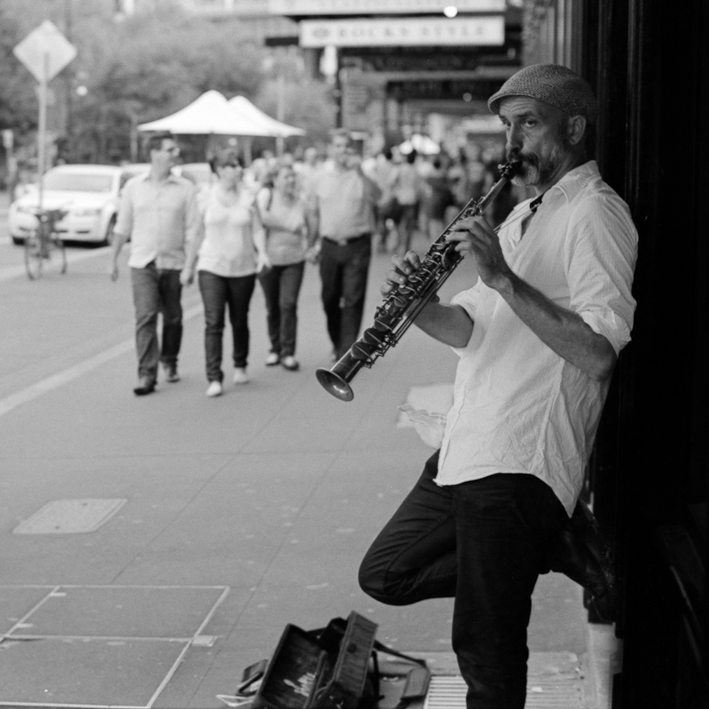
A cool Jazz Cat
Of all the people on the street I find buskers and musicians the easiest ones to approach. I always walk up and drop a couple of dollars before even asking to take their photograph, I think it tells them that I appreciate who they are and the music they are making. Normally if they are playing I will just motion to my camera with a smile, if they smile or nod back I will take the shot. If not, just walk away.
As you can probably tell from looking at the contact sheet is that I have cropped out the couple that were walking by. The original idea was to include some one walking by to fill the space on the left, however this couple spotted me and were either trying to be nice and get out of frame or did not want to take there shot. I am quite happy with the way it turned out though, the way he leans against the wall and is looking out towards me. After seeing how that couple reacted I don't think he would have been too happy if I hanged around scaring every one away so I moved off.
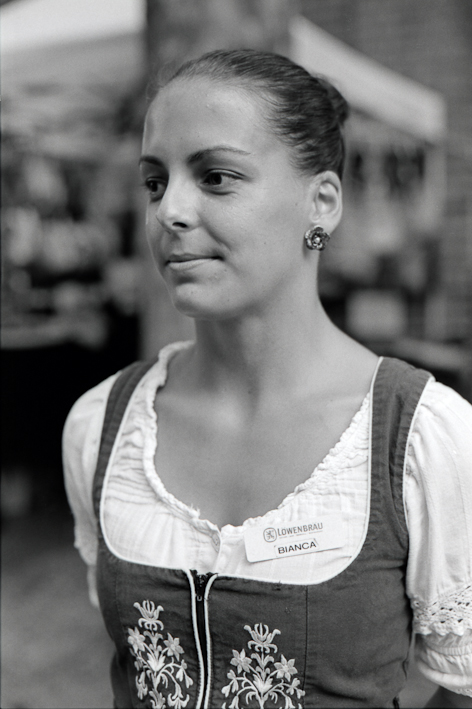
Bianca
She was just around the corner from the Jazz player in the middle of her shift working at the Löwenbräu bar in Sydney as a waitress on the outside tables. She is also the first time I have ever walked up to someone and ask to take there photograph outside of street musicians. I was a little bit nervous and made a bit meal off it but she did not say no. She is a lovely women , I really like how smooth her skin turned out as well as the detail in her uniform.
What I see every time I see this shot is her trying to look anywhere but this crazy guy with an old Nikon F3 camera. What I really should have done was tried to get her to look at me to get some more light into her eyes.

Feel the Cords
This was taken just 100m further down the road from Bianca. He was a warm up act the the band that are setting up behind him. I started by trying to take a shot of him playing with the audience watching (100 people), but after I took that shot I remember Capa's quote that you always need to get closer. So I headed right down to the front and took a seat on the ground and waited for about 5 minutes, listening to some great classical guitar music, for the guys setting up to move out of frame.
Looking back on it now, I like the expression on his face, the concentration the feeling of the music and, the slight movement of his foot as he keeps the beat. But for me I wish I had captured his hands in a slightly better position.
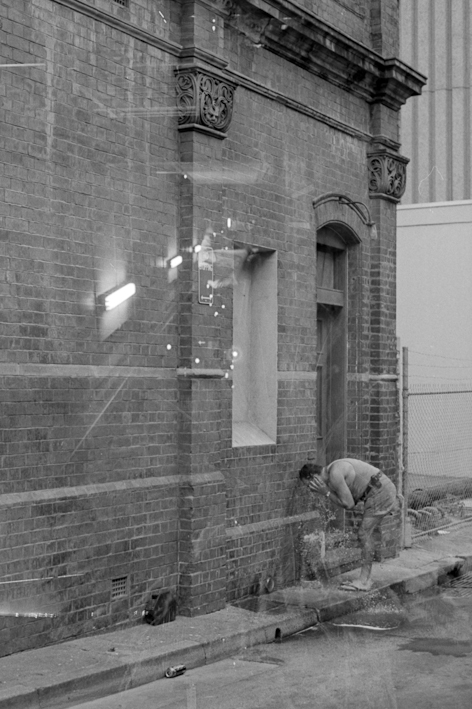
The Problem Frame
Some times every just goes wrong. This is a Frame in point. This was originally going to be a night scape of Cronulla beach like the previous shot but one stop longer. But the batteries died, yep it can even happen in some of the old SLR's. So I gave up for the night forgetting that I had another set of batteries in the other camera till I got back to the train station. You can see some of the lights of the buildings.
While I was waiting for the train to head home I took another shot at the train station. So I put in the set of batteries in from the other camera and as not to waste the frame used the multiple exposure feature to cock the shutter while not advancing the film, took the shot and thought it was all ok. Opps, I had forgotten to turn the nob back to normal film progression so when I wound on I had not advanced the film but only readied the camera for the next shot.
At the time I was trying to capture the final image the architecture of the building and him washing his face, but I wish Capa's quote came to mind here as I think the real shot was to get up real close instead of hiding at the entrance of the alleyway. It could have had a real timeless quality as it was the middle of summer during a hot spell, but by his act and what he was wearing with that building as a back drop it could have been taken in any era.
Hello World
I will totally ignore the discussion on which one is better. In my mind it is the same as claiming that the only real paintings paintings are oils, relegating watercolours to the trash can. They are after just different mediums with a different technique, look and, feel.
As this is the first post photographic journey that have lead me to this point.
How does one become interested in photography? In most cases it is something that is there from childhood, either being given a camera, seeing a print develop in the dark room or having your parents trust you enough to use the family camera. In my case it was the last point, always wanting to be a good boy in my parents eyes. The camera was a Yaschia SLR with a 50mm f2 lens which we still have, but has not been used for the past decade.
There was just something special about looking through the view finder of those old SLRs, the feeling of photography.
A couple of years ago now (2009) I bought myself a brand spanking new Nikon D90 as a birthday present to myself. A SLR all of my own. Something to make great photographs with, because surly it is the camera that does all the work. Sadly that is not the truth of the matter, as a carpenter has a hammer a photographer has a camera.
It was at this point I set out to learn every thing that I could which involved reading as many photography magazines as I could. At the start they were all great with all sorts of useful information. As time passes I am getting more picky about which ones I would actually pay for I was getting sick of reading the same things over and over again.
So here I am today getting less and less interested in reading about technique and more interested in learning actual photography from the masters, the art of seeing light or getting that one pose from someone to make a powerful portrait. Hopefully this is something I will be able to share with you all.